

Navigating a large codebase for the first time is painful. You clone the repo, realize there are 300 files, and have no idea where anything lives.
You can ask an AI assistant, but it burns through context fast and you never know if it hallucinated a file path that does not even exist.
Codebase Navigator solves this. Paste a URL, ask anything in plain English, and watch a real dependency graph built from actual import statements appear in real time.
It is built using CopilotKit, Zenflow, GitHub API and React Flow. You can run it completely free using Ollama locally.
In this blog, we will go through the architecture, the key patterns and how everything works end-to-end.
What are we building?
Codebase Navigator lets you paste any public GitHub repo URL and ask questions about it in plain English. Instead of getting a wall of text back, you get four panels that all update at once.
| Panel | What it does |
|---|---|
| Graph Canvas | Live dependency graph built from real import statements |
| Code Viewer | File content fetched live from GitHub, relevant lines highlighted |
| Repo Explorer | Full file tree, click any file to open it |
| Chat | Follow-up questions and plain English explanations |
The graph morphs to show every relevant file connected by real imports, the code viewer opens the file, and the chat explains what each piece does. No context switching.
You can run it completely free using Ollama locally without any API key.
Here is the full request → response flow of what happens when you ask a question:
User types "how does auth work?"
     ↓
CopilotChat → POST /api/copilotkit
     ↓
LLM receives repo context (file paths, current selection, system rules)
     ↓
LLM calls analyzeRepository tool
     ↓
Tool fetches relevant files via /api/github/file
     ↓
Extracts import/require statements → resolves paths → builds dependency graph
     ↓
Zustand store updates
     ↓
All four panels re-render live: graph, file tree, code viewer, chat response
Tech Stack & Tools
At a high level, this project is built by combining:
Next.js 16 - frontend and API routes
CopilotKit - agent-UI state sync and chat interface. provides built-in hooks & components like
useAgentContext,useFrontendTool,CopilotChatZenflow - workflow tool that planned, tested and orchestrated the build
React Flow & dagre - interactive dependency graphs with automatic layout
Octokit - GitHub API proxy for fetching repo trees and file contents
Zustand - shared state across all four panels
Tailwind CSS - styling
Ollama / OpenAI - local or cloud LLM backend switchable from the UI
The CopilotKit runtime is self-hosted inside a Next.js API route, which lets you plug into any OpenAI-compatible backend, including Ollama, for completely free local inference.
It connects your UI, agents, and tools into a single interaction loop.

What is Zenflow?
Zenflow is an AI development tool that treats building software as a structured engineering process rather than just autocompleting code.
This project was planned, built, tested, reviewed and deployed using Zenflow (Zencoder's workflow engine) in a single session.

It ran a six-phase process from scratch:
- Architecture and spec
- Scaffolding and foundation
- Data layer (GitHub API integration)
- AI layer (CopilotKit actions and context)
- Visual layer (React Flow graphs)
- Final assembly and wiring
Each phase was verified with lint, type checks and tests before moving to the next. After the build, it performed a code review, found 14 issues and fixed 11 systematically:
- API keys exposed in headers → moved to httpOnly cookies
- Fake star-shaped graphs → replaced with real import-based dependency resolution
- Duplicate file-fetching logic → consolidated into a single cached utility
The .zenflow/ folder in the repo contains the task plan, spec, and report files it generated along the way.
That's how we built it with Zenflow. Here's the architecture that came out of it.
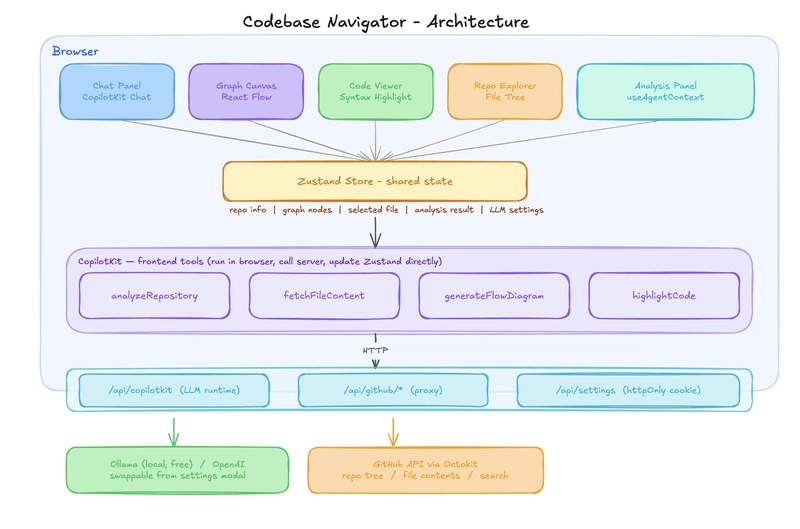
Architecture & Project Structure
The app is split into three layers: the browser handles all UI and AI tool logic, Next.js API routes act as a secure proxy to external services, and GitHub API, plus the LLM backend sits at the bottom. Nothing in the browser talks to GitHub or the LLM directly.
Below is a high-level overview of all the layers and how they are organized.
┌─────────────────────────────────────────────────────────┐
│                        BROWSER                          │
│                                                         │
│  ┌─────────┐  ┌──────────┐  ┌──────────┐  ┌────────┐    │
│  │  Chat   │  │  Graph   │  │  Code    │  │  File  │    │
│  │  Panel  │  │  Canvas  │  │  Viewer  │  │  Tree  │    │
│  └────┬────┘  └────┬─────┘  └────┬─────┘  └───┬────┘    │
│       └────────────┴─────────────┴────────────┘         │
│                          │                              │
│                   ┌──────▼──────┐                       │
│                   │   Zustand   │  ← shared state       │
│                   └──────┬──────┘                       │
│                          │                              │
│              ┌───────────▼────────────┐                 │
│              │      CopilotKit        │                 │
│              │   frontend tools       │                 │
│              │  analyzeRepository     │                 │
│              │  fetchFileContent      │                 │
│              │  highlightCode         │                 │
│              └───────────┬────────────┘                 │
└──────────────────────────┼──────────────────────────────┘
                           │
┌──────────────────────────▼──────────────────────────────┐
│                    NEXT.JS API ROUTES                   │
│                                                         │
│   /api/copilotkit     /api/github/*     /api/settings   │
│   (LLM runtime)       (proxy)          (httpOnly cookie)│
└──────────┬────────────────┬─────────────────────────────┘
           │                │
     ┌─────▼─────┐   ┌──────▼──────┐
     │  Ollama   │   │  GitHub API │
     │  / OpenAI │   │  (Octokit)  │
     └───────────┘   └─────────────┘
Here is a simplified view of how the project is structured.
src/
├── app/api/
│   ├── copilotkit/route.ts    → CopilotKit runtime endpoint
│   ├── github/
│   │   ├── tree/route.ts      → fetch repo tree
│   │   ├── file/route.ts      → fetch + base64-decode file
│   │   └── search/route.ts    → code search
│   └── settings/route.ts      → LLM config (httpOnly cookie)
├── components/
│   ├── panels/     → 5 UI panels (chat, graph, code, analysis, repo)
│   └── flow/       → custom React Flow node types
├── hooks/          → AI tool registration, agent context sync, repo loading
├── lib/            → import extraction, dagre layout, Octokit client
├── store/          → Zustand (AppState + SettingsState)
└── .zenflow/       → Zenflow task plan, spec and report
Let's get into how everything works behind the scenes. This will help you understand the key patterns.
How everything works under the hood
Now that you have the big picture, let's go through each piece in detail.
A lot is happening under the surface, so we will break it down into ten parts, starting from when you first load a repo all the way to how state flows across the panels.
1. Loading a repository
When you paste a GitHub URL and click Explore, useRepository.loadRepository() fires (from useRepository.ts hook).
It calls /api/github/tree on the server, which uses Octokit to:
- Parse the repo URL into
{ owner, repo } - Fetch the default branch
- Get the full recursive file tree from the GitHub Trees API
- Convert the flat array into a nested
TreeNodestructure
Here is what the src/api/github/tree/route.ts route looks like:
export async function GET(request: NextRequest) {
  const { owner, repo } = parseRepoUrl(repoUrl);
  const resolvedBranch = branch || (await getDefaultBranch(owner, repo));
  const tree = await getRepoTree(owner, repo, resolvedBranch);

  return NextResponse.json({ owner, repo, branch: resolvedBranch, tree });
}
That nested tree powers the sidebar file explorer and becomes the starting point for everything else.
All GitHub calls are proxied through Next.js API routes. The browser never talks to GitHub directly to keep tokens secure.

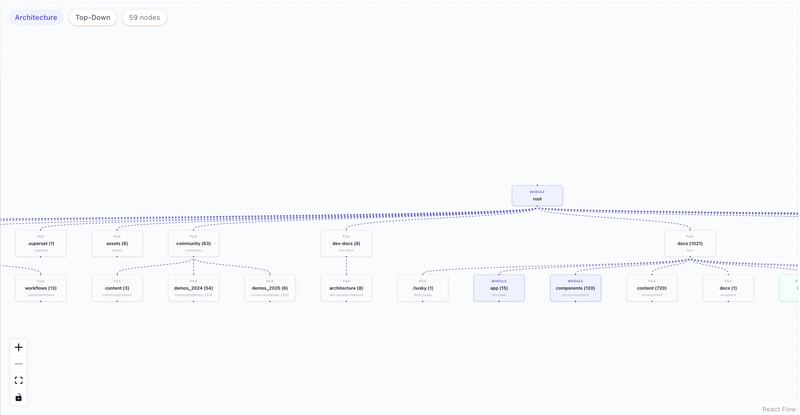
2. From architecture view to dependency graph
This is the visual moment that makes the app feel alive. The graph you see on load (the architecture view) and the graph you see after asking a question (the dependency graph) are two completely different things, built two different ways.
Both live in src/lib/analyzer.ts - buildOverviewGraph for the architecture view and buildDependencyNodes for the dependency graph.
When the repo loads, useRepository.ts calls buildOverviewGraph right after the tree response comes back and pushes the result straight to the graph:
const overview = buildOverviewGraph(data.tree);
setVisualization(overview.nodes, overview.edges, "architecture");
buildOverviewGraph never fetches any files. It just walks the tree structure and builds a folder map: root node at the top, top-level directories as children, one level of sub-folders below that:
export function buildOverviewGraph(tree: TreeNode) {
  const rootId = `node-${nodeId++}`;
  nodes.push({ id: rootId, type: "module", label: tree.path || "root" });

  const topDirs = (tree.children || []).filter((c) => c.type === "directory");

  for (const dir of topDirs) {
    const fileCount = flattenTree(dir).length;
    nodes.push({ id, label: `${dir.name} (${fileCount})`, type: categorizeDirType(dir.path) });
    edges.push({ source: rootId, target: id, type: "flow" });
  }
}
The edges here mean nothing beyond "this folder is inside that folder."

Once you ask a question, useCopilotActions.ts fetches the actual file content and calls buildDependencyNodes instead:
const graph = buildDependencyNodes(fileData);
setVisualization(graph.nodes, graph.edges, "dependency");
buildDependencyNodes creates one node per file and one edge per real import statement:
export function buildDependencyNodes(files: { path: string; imports: string[] }[]) {
  const nodes = files.map((file) => ({
    id: file.path,
    type: "file",
    label: file.path.split("/").pop() || file.path,
    metadata: { fullPath: file.path },
  }));

  for (const file of files) {
    for (const imp of file.imports) {
      const resolved = resolveImportPath(imp, file.path, filePathSet);
      if (resolved) {
        edges.push({ source: file.path, target: resolved, type: "import" });
      }
    }
  }

  return { nodes, edges };
}
Same setVisualization call, different data. React Flow re-renders and the graph morphs from a folder map into a real dependency graph focused on exactly the files relevant to your question.
3. The CopilotKit runtime
The /api/copilotkit route is where LLM requests actually land. The API key and provider config are stored in an httpOnly cookie, meaning they live on the server and never get sent to the browser.
The route reads that config, creates an OpenAI-compatible client, and hands the request to the CopilotKit runtime:
export const POST = async (req: NextRequest) => {
  const { baseURL, apiKey, model } = await getLLMConfig();

  const openai = new OpenAI({ baseURL, apiKey });
  const serviceAdapter = new OpenAIAdapter({ openai, model });
  const runtime = new CopilotRuntime();

  const { handleRequest } = copilotRuntimeNextJSAppRouterEndpoint({
    runtime,
    serviceAdapter,
    endpoint: "/api/copilotkit",
  });

  return handleRequest(req);
};
The defaults point to Ollama on localhost:11434/v1 with qwen2.5.
Because the OpenAI SDK accepts a custom baseURL, swapping to OpenAI, Groq or any other provider is just a config change with no code changes needed.


4. Feeding the LLM context
Before the LLM can answer anything useful, it needs to know what repo is loaded and what files exist. That is the job of the useCopilotContext.ts hook.
It calls useAgentContext, a CopilotKit hook that attaches structured data to every message you send. You can call it multiple times to attach different pieces of context.
Here it is called twice: once for the file list and once for the system instructions that tell the LLM how to behave:
useAgentContext({
  description: "File paths in the repository (max 500), one per line",
  value: fileList,  // flattened from the TreeNode structure
});

useAgentContext({
  description: "System instructions",
  value: `You are a Codebase Navigator assistant. You MUST use tool calls to answer questions.
CRITICAL RULES:
1. For ANY question about the repository call the "analyzeRepository" tool.
2. To show a file, call "fetchFileContent" with the exact file path.
3. NEVER respond with only text. ALWAYS call a tool first.
4. Use ONLY file paths from the file list above.`
});
The file list is capped at 500 paths to stay within token limits.
Because this hook re-runs every time the Zustand store changes, the LLM always sees the current repo, selected file and analysis state rather than a stale snapshot from when the page loaded.
Note: If you are running a local model with a large context window, you can raise this limit in useCopilotContext.ts.
5. The four frontend tools
This is the core of how the app works. Instead of just replying with text, the LLM can call tools. Each tool has a name, a set of parameters it accepts and a handler, which is just a function that runs when the LLM calls it.
CopilotKit lets you register these tools directly in the browser using the useFrontendTool hook, which is defined in useCopilotActions.ts.
When a tool's handler runs, it updates Zustand state directly, which is why all four panels, the graph, code viewer, analysis panel, and chat, react at the same time without any extra wiring.
analyzeRepository is the main tool the LLM calls for almost every question. Here is what it does step by step:
useFrontendTool({
  name: "analyzeRepository",
  parameters: z.object({
    query: z.string(),
    explanation: z.string(),
  }),
  handler: async ({ query, explanation }) => {
    // 1. Find relevant files using keyword matching
    const matchedPaths = findFilesByQuery(repo.tree, query);

    // 2. Cap at 15 files to keep things fast
    const capped = matchedPaths.slice(0, 15);

    // 3. Fetch each file content (cached)
    const fileData = await Promise.all(
      capped.map(async (p) => ({
        path: p,
        imports: extractImports(await fetchFile(owner, repo, p, branch)),
      }))
    );

    // 4. Build real dependency graph from actual import statements
    const graph = buildDependencyNodes(fileData);

    // 5. Categorize each node by file type
    graph.nodes.forEach(node => {
      node.type = categorizeFileType(node.metadata.fullPath);
    });

    // 6. Push to Zustand - all four panels react
    setAnalysisResult({ explanation, relevantFiles, flowDiagram: graph });
    setVisualization(graph.nodes, graph.edges, "dependency");
  },
});
fetchFileContent opens a specific file in the code viewer. The LLM calls this when you ask it to show you a file, it just fetches the content and calls setCodeViewer:
useFrontendTool({
  name: "fetchFileContent",
  parameters: z.object({
    filePath: z.string(),
  }),
  handler: async ({ filePath }) => {
    const content = await fetchFile(repo.repoInfo.owner, repo.repoInfo.repo, filePath, repo.repoInfo.branch);
    setCodeViewer(filePath, content);
  },
});
generateFlowDiagram is similar to analyzeRepository but more focused. Instead of searching the whole repo, you give it a specific list of file paths and it builds a graph for just those files. Useful when you want to visualize a slice of the codebase like just the API layer:
useFrontendTool({
  name: "generateFlowDiagram",
  parameters: z.object({
    files: z.array(z.string()),
    diagramType: z.enum(["dependency", "flow", "architecture"]),
  }),
  handler: async ({ files, diagramType }) => {
    const fileData = await Promise.all(files.slice(0, 20).map(async (f) => ({
      path: f,
      imports: extractImports(await fetchFile(repo.repoInfo.owner, repo.repoInfo.repo, f, repo.repoInfo.branch)),
    })));
    const graph = buildDependencyNodes(fileData);
    setVisualization(graph.nodes, graph.edges, diagramType);
  },
});
highlightCode fetches a file and highlights specific line numbers with an explanation. The LLM uses this when it wants to point at exactly where something happens in the code:
useFrontendTool({
  name: "highlightCode",
  parameters: z.object({
    filePath: z.string(),
    lines: z.array(z.number()),
    explanation: z.string(),
  }),
  handler: async ({ filePath, lines, explanation }) => {
    const content = await fetchFile(repo.repoInfo.owner, repo.repoInfo.repo, filePath, repo.repoInfo.branch);
    setCodeViewer(filePath, content, lines, explanation);
  },
});
Notice that none of these tools returns text to the chat. They all just update the state. The LLM is not describing what it found, it is directly controlling what you see on screen.
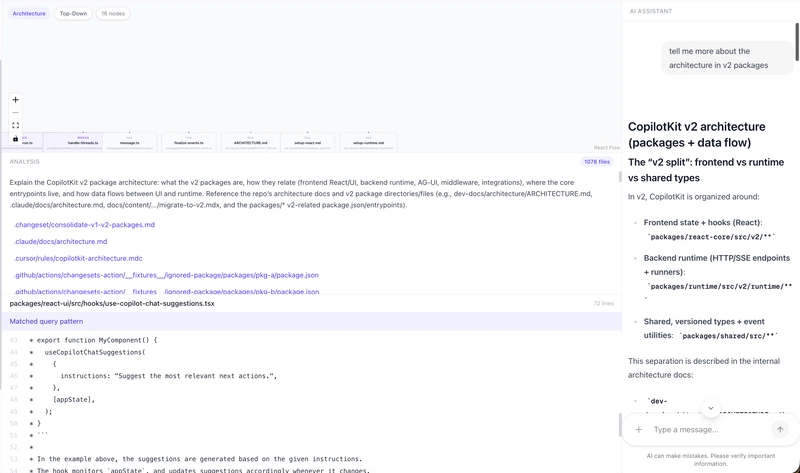
For instance, I asked about the architecture of v2 packages.
6. Finding relevant files
When analyzeRepository gets a query like "how does authentication work?", it needs to figure out which files to actually look at. That is handled by findFilesByQuery in src/lib/analyzer.ts.
It checks if the query matches one of six predefined categories, each with a set of keywords and file path patterns:
const ANALYSIS_CATEGORIES = [
  {
    name: "authentication",
    keywords: ["auth", "login", "logout", "token", "jwt", "session", "oauth"],
    filePatterns: [/auth/i, /login/i, /session/i, /oauth/i, /jwt/i],
  },
  {
    name: "database",
    keywords: ["database", "db", "model", "schema", "prisma", "mongoose"],
    filePatterns: [/model/i, /schema/i, /migration/i, /prisma/i, /db/i],
  },
  // ... api, configuration, testing, styling
]
If the query matches a category, it filters all file paths using that category's regex patterns.
If nothing matches, it falls back to splitting the query into individual terms and checking if any file path contains them. So even a vague query like "where is the config" will still find files with "config" in the name.
This is intentionally simple. No embeddings, no vector search, just regex on file names. It works well because file names in well-structured projects are usually descriptive enough that matching on them gets you the right files.
7. File caching
Every time a tool fetches a file, it goes through src/lib/fetch-file.ts which maintains an in-memory cache with a 5-minute TTL:
const cache = new Map<string, { content: string; timestamp: number }>();
const CACHE_TTL = 5 * 60 * 1000; // 5 minutes

export async function fetchFile(owner, repo, path, ref) {
  const key = `${owner}/${repo}/${ref}/${path}`;
  const cached = cache.get(key);

  if (cached && Date.now() - cached.timestamp < CACHE_TTL) {
    return cached.content; // serve from cache
  }

  const res = await fetch(`/api/github/file?repo=...&path=...&ref=...`);
  const data = await res.json();
  cache.set(key, { content: data.content, timestamp: Date.now() });

  // LRU eviction: if over 200 items, drop the oldest 50
  if (cache.size > 200) {
    const oldest = [...cache.entries()].sort((a, b) => a[1].timestamp - b[1].timestamp);
    for (let i = 0; i < 50; i++) cache.delete(oldest[i][0]);
  }

  return data.content;
}
This matters because analyzeRepository fetches up to 15 files at once. A follow-up question about the same files hits the cache instead of making 15 more API requests.
Without a GitHub token, you are limited to 60 requests per hour, so caching is what makes repeated questions fast and free.
The cache also evicts the oldest entries once it crosses 200 items, so it never grows unbounded in long sessions.
8. Parsing imports and resolving paths
Once analyzeRepository has the relevant file paths, it fetches each file and parses it for import statements. Both functions that handle this live in src/lib/analyzer.ts.
extractImports runs on the raw file content and pulls out every import, handling both ES6 and CommonJS syntax:
export function extractImports(content: string): string[] {
  const imports: string[] = [];

  // ES6: import X from 'y' and import 'y'
  const esImports = content.matchAll(
    /(?:import\s+.*?\s+from\s+['"](.+?)['"]|import\s+['"](.+?)['"])/g
  );
  for (const match of esImports) imports.push(match[1] || match[2]);

  // CommonJS: require('y')
  const requires = content.matchAll(/require\s*\(\s*['"](.+?)['"]\s*\)/g);
  for (const match of requires) imports.push(match[1]);

  return imports;
}
But raw import strings like "./utils" or "@/lib/github" are not file paths yet.
buildDependencyNodes calls resolveImportPath on each one to turn them into actual paths that exist in the repo:
function resolveImportPath(importPath, fromFile, filePathSet) {
  // Skip npm packages (no ./ or @/)
  if (!importPath.startsWith(".") && !importPath.startsWith("@/")) return null;

  // Resolve @/ alias to src/
  if (importPath.startsWith("@/")) {
    resolved = "src/" + importPath.slice(2);
  }

  // Try with common extensions: .ts, .tsx, .js, /index.ts, etc.
  const extensions = ["", ".ts", ".tsx", ".js", ".jsx", "/index.ts", "/index.tsx"];
  for (const ext of extensions) {
    if (filePathSet.has(resolved + ext)) return resolved + ext;
  }
  return null;
}
npm packages like react or zod are skipped immediately since they do not start with ./ or @/. For local imports, it tries common extensions like .ts, .tsx, and /index.ts, so it handles both direct file imports and folders that export through an index file.
If the resolved path does not exist in the repo, it returns null and no edge is created. That is what keeps the graph honest.
9. Graph layout with Dagre
Once the nodes and edges are built, they need actual positions on screen before React Flow can render them. That is what applyDagreLayout does in src/lib/graph-layout.ts.
It uses Dagre, a JavaScript library that automatically calculates x and y coordinates for every node in a directed graph so nothing overlaps, all on the client side with no server needed:
export function applyDagreLayout(nodes, edges, options = {}) {
  const g = new dagre.graphlib.Graph();
  g.setGraph({ rankdir: "TB", ranksep: 80, nodesep: 40 });

  // Tell dagre the size of each node
  for (const node of nodes) {
    g.setNode(node.id, { width: 200, height: 60 });
  }
  for (const edge of edges) {
    g.setEdge(edge.source, edge.target);
  }

  dagre.layout(g); // dagre calculates x,y for every node

  return nodes.map((node) => {
    const pos = g.node(node.id);
    return { ...node, position: { x: pos.x - 100, y: pos.y - 30 } };
  });
}
The direction can be toggled between top-to-bottom (TB) and left-to-right (LR) from the UI.
Each node type maps to a React Flow component based on the file type categorizeFileType assigned earlier:
-
module/service→ModuleNode(indigo) -
function→FunctionNode(teal) -
file→FileNode(gray)

10. State management with Zustand
All four panels stay in sync because they all read from the same Zustand store in src/store/index.ts. The store has four slices, one for each major concern:
interface AppState {
  repo: {
    repoInfo: RepoInfo | null;   // owner, repo, branch
    tree: TreeNode | null;        // full file tree
    selectedFile: string | null;  // active file path
    loading: boolean;
    error: string | null;
  };
  analysis: {
    result: AnalysisResult | null; // explanation + relevant files + graph
    loading: boolean;
    error: string | null;
  };
  visualization: {
    nodes: FlowNode[];
    edges: FlowEdge[];
    graphType: "dependency" | "flow" | "architecture" | null;
  };
  codeViewer: {
    filePath: string | null;
    content: string | null;
    highlightedLines: number[];
    explanation: string | null;
  };
}
Each panel subscribes to only the slice it needs using a selector like useAppStore((s) => s.visualization).
So when a tool calls setVisualization, only the graph panel re-renders. When setCodeViewer fires, only the code viewer updates. Nothing else moves.
Settings like LLM provider, API key and model live in a separate SettingsState store. It syncs to two places:
-
localStorageso the browser remembers your config across reloads - an httpOnly cookie so the server-side
/api/copilotkitroute can read them without the API key ever appearing in request headers
This is how everything works behind the scenes. It's time to run it locally.
Running it locally
Clone the GitHub repository and install the dependencies.
git clone <repo-url>
cd codebase-navigator
npm install
npm run dev

Open http://localhost:3000 to view it live in the browser. Here is how to set up each provider.
Using OpenAI
You will need an OpenAI API Key. Then just click the Settings icon in the top right, switch the provider to OpenAI, paste your API key and pick a model like gpt-5.2. That's it.

Using Ollama (free, runs locally)
You can download it from ollama.com or install it via these commands based on the operating system you use.
brew install ollama #macOS
curl -fsSL https://ollama.com/install.sh | sh #linux

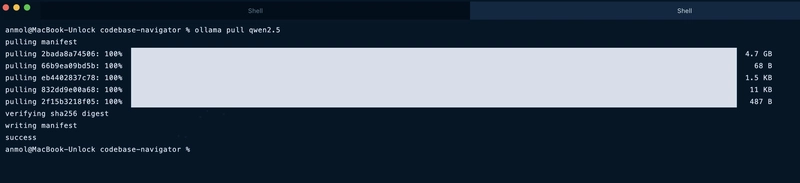
Then pull the model and start the server:
ollama serve
ollama pull qwen2.5 # in another terminal

The app points to Ollama by default so nothing else needs to change. Just open http://localhost:3000 and it works.
For GitHub, public repos work without a token (the only catch is that it's limited to 60 requests per hour). Add a GITHUB_TOKEN to a .env.local file for higher limits:
GITHUB_TOKEN=your_token_here
I tried it with the CopilotKit GitHub repo and it immediately maps out the entire repo structure.

I asked it, "tell me about architecture" and it gave me:
- a graph of every relevant file connected by real imports
- a plain english breakdown of what each file does
- raw code fetched live from GitHub
- a detailed chat response I could keep following up on


I tried difficult and vague questions and it handled all of them.

The bigger picture
This project started with wiring three ideas together and seeing what happened.
GitHub is the data source, not just a host. Every file the AI references gets fetched live, parsed, and reasoned about on the spot. No hallucination, no guessing from memory.
CopilotKit changes what the AI can actually do in the browser. Instead of replying with text, it calls tools that update the state directly. The graph changes. The code viewer opens. The AI is not describing what it found, it is showing you.
The dependency edges are real. A lot of tools draw graphs that look impressive but mean nothing. Every edge here exists because one file has an actual import statement pointing to another. That is it.
Wire those three together and you get something that actually understands the codebase instead of just searching through it.
There is a lot you could extend from here: PR diff exploration, multi-repo comparison, security audit mode. But as a starting point for understanding any codebase, it already does exactly what it needs to.
Let me know what you think in the comments!
You can connect me on GitHub, Twitter and LinkedIn.
Follow CopilotKit on Twitter and say hi, and if you'd like to build something cool, join the Discord community.


Top comments (24)
the context-burning problem is real - spent hours feeding files into Claude before the conversation just becomes useless. the dependency graph approach is smart, wondering how it handles monorepos where cross-package imports can get gnarly.
yeah, it only sees paths and fetches on demand, which is why it doesn't burn tokens. though some models of Ollama is definitely slower (when I was playing around it)
Monorepo cross-package imports are the weak spot though. The
resolveImportPathlogic only handles./and@/aliases, so@scope/packageimports get silently dropped and those cross-package edges won't appear in the graph. Scoping analysis perpackages/subdirectory would fix most of it... definitely ask claude code (I might be wrong)the on-demand fetch makes sense for token efficiency. monorepo @scope handling is a real gap though - that covers a lot of actual setups.
This is genuinely useful - onboarding onto a large repo is one of those things that takes way longer than it should. Pasting a GitHub URL as the input is smart because it skips the whole 'clone and set up locally just to understand structure' step. Curious how it handles monorepos - do you index the whole thing or just from a given entry point?
Yeah anyone can analyze large repos without burning tokens.
Right now it fetches the full recursive tree from the root so for a monorepo it indexes everything. But you can always just ask in the chat and it figures out the structure on its own. Dedicated package level entry points would be a solid extension in my opinion!
Really smart concept and strong execution, turning repo exploration into a live visual workflow makes the value instantly clear. I especially like that the dependency graph is grounded in real imports, which makes the tool feel far more trustworthy than typical AI code assistants
thanks! yeah that was the core idea & makes a huge difference in reliability
This is such a smart way to make large repos feel approachable. The dependency graph + code viewer combo feels way more practical than another chat-only code tool, and local LLM support is a huge win. Nicely thought through.
haha yes, I don't wanna burn through context (tokens) just exploring the graph. running it local just removes that whole problem.
i've been using mega llm for similar tasks connecting it to my local dev env to summarize code and even draft commit messages. seeing tools like this emerge in the open source space is awesome. makes contributing to lrger projects much less intimidating
onboarding to monoliths usually means three days of grep and reading abandoned pull requests. a tool that maps dependencies from a url would have saved me so many headaches on legacy systems i mostly worry about hallucinated imports when the model guesses at priate package structures, but for surface level architecture its exactly what onboarding docs should be.
indexing remote repos on the fly saves a ton of local setup just watch the context window on heavy frameworks. it's a quick way to trace function calls without cloning everything first.
The live dependency graph visualization is what sets this apart from standard code search tools. Being able to see how modules connect in real-time while asking questions gives you spatial context that grep/ripgrep simply can't provide.
One use case I'd love to see explored: using this for onboarding new team members. Instead of spending days reading through unfamiliar codebases, you could literally ask "how does authentication flow through this app?" and get a visual map. The combination of LLM understanding + graph visualization could compress weeks of code archaeology into hours.
The live dependency graph visualization is a killer feature for onboarding onto unfamiliar codebases. I work with a lot of client codebases and the first 2-3 hours are always spent just understanding the architecture and file relationships. Having a visual map that shows how everything connects would cut that time dramatically. The local LLM support is a smart move too — a lot of organizations I work with can't send proprietary code to external APIs, so being able to run inference locally against Ollama makes this actually usable in enterprise settings where security policies are strict. Would be interesting to see this integrated with MCP so AI coding agents could use it as a tool to understand codebase structure before making changes.
loved the framing of this "google maps for codebases" is such a good way to put it. been meaning to explore a large repo without cloning it locally and this looks like exactly that. going to try it out!
The approach of building dependency graphs from actual import statements rather than relying on the LLM to guess is really smart. I run a large Astro site with thousands of pages and the biggest pain point with AI code assistants has always been hallucinated file paths — they confidently reference files that don't exist.
The file caching layer with LRU eviction is a nice touch too. At 60 req/hour on the free tier, you'd burn through that fast without it. Curious — have you tested this on repos with heavy re-exports or barrel files? Those tend to create misleading dependency chains where the graph shows a direct connection but the actual code path goes through 3-4 index.ts files.
yeah, hallucinated file paths are honestly one of the most annoying things about AI code assistants.
tried it on a couple of large repos but haven't really stress-tested barrel file / re-export heavy setups specifically.. if you run into weird behavior, feel free to open an issue in the repo and I'm sure it will get worked on!